
About This Recipe
Stuffed mashed potato nests are a creative and versatile side dish or appetizer. The concept involves shaping prepared mashed potatoes into cup-like forms, which are then baked or fried until the exterior is golden and crisp. The resulting hollow center is ideal for holding a variety of savory fillings, creating a contrast between the crispy potato shell and the soft, creamy interior and filling.
Why You’ll Love This Recipe
- Textural Contrast: Achieves a satisfying crispy exterior while maintaining a creamy mashed potato center.
- Versatile Vessel: The nests act as an edible bowl for a wide range of fillings, from cheeses to meats and vegetables.
- Efficient Use of Leftovers: This recipe is an effective method for utilizing and transforming leftover mashed potatoes.
- Visually Appealing: The distinct nest shape provides an elegant and professional presentation for any meal.
Ingredients
- 4 cups cold mashed potatoes
- 1 large egg, beaten
- 1/4 cup all-purpose flour (or cornstarch for gluten-free option)
- 1/2 cup grated Parmesan cheese
- 1/4 teaspoon black pepper
- 1 tablespoon chopped fresh chives (optional)
- Cooking spray or oil for greasing
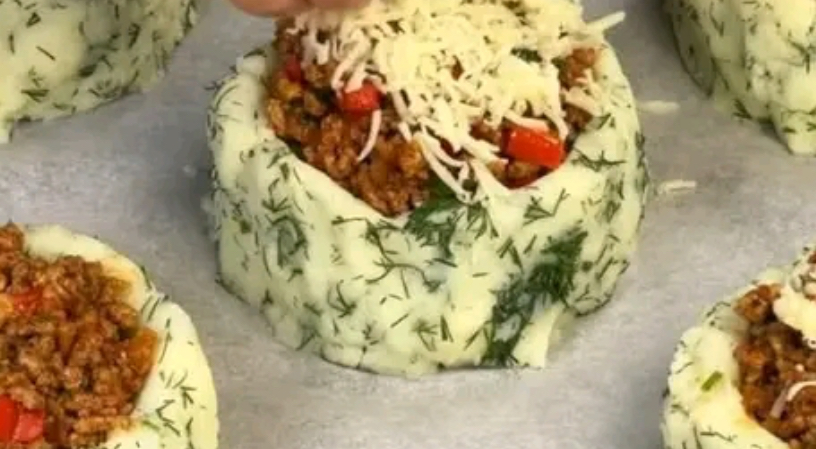
- 1 cup filling of choice (e.g., shredded cheddar cheese, cooked bacon pieces, sautéed mushrooms, caramelized onions, sour cream)
Step by Step Instructions
- Preheat your oven to 400°F (200°C). Generously grease a standard 12-cup muffin tin with cooking spray or oil.
- In a large mixing bowl, combine the cold mashed potatoes, beaten egg, flour, Parmesan cheese, black pepper, and chives (if using). Mix until all ingredients are fully incorporated.
- Divide the potato mixture evenly among the 12 greased muffin cups.
- Using your fingers or the back of a spoon, press the potato mixture into the bottom and up the sides of each cup, forming a hollow nest or cup shape with a well in the center.
- Bake for 25-30 minutes, or until the edges and tops of the nests are golden brown and crisp.
- Remove the muffin tin from the oven. If the centers have puffed up, gently press them down with the back of a spoon to re-form the well.
- Add your desired fillings (e.g., shredded cheese) into the center of each hot potato nest.
- Return the muffin tin to the oven for 3-5 minutes, just until the fillings are melted or warmed through.
- Allow the nests to cool in the tin for 5-10 minutes before carefully removing them with a spoon or offset spatula. The initial cooling period helps them set and maintain their shape.
- Garnish with additional toppings like bacon bits or chives, and serve warm.
FAQ
Can I make these ahead of time?
Yes, you can prepare the potato mixture and form the nests in the muffin tin up to a day in advance. Cover tightly with plastic wrap and refrigerate. Bake as directed when ready to serve, adding a few extra minutes to the baking time if needed since you are starting from cold.
My mashed potatoes are very soft. Will this work?
Very soft or wet mashed potatoes can make the nests difficult to form and may result in a less crisp texture. To fix this, add more binding agents like additional flour or Parmesan cheese to the mixture until it is firm enough to hold its shape.
Can I freeze potato nests?
It is possible to freeze the baked, unfilled nests. After baking and cooling, arrange them in a single layer on a baking sheet to freeze solid, then transfer to a freezer bag. Reheat directly from frozen in a 375°F (190°C) oven until hot and crisp again before adding fillings.
You Must Know
- The key to achieving a crispy exterior is ensuring the mashed potato mixture is not too wet. Thicker, cold mashed potatoes work best.
- Greasing the muffin tin thoroughly is a critical step to prevent the potato nests from sticking and breaking upon removal.
- The egg and flour in the recipe act as binders to help the nests hold their structural integrity during and after baking.
- Allowing the nests to rest and cool in the tin for several minutes after baking makes them much easier to remove intact.
Storage Tips
- Refrigeration: Store leftover filled or unfilled nests in an airtight container in the refrigerator for up to 3 days.
- Reheating: Reheat leftovers in an oven or toaster oven at 375°F (190°C) for about 10-15 minutes to restore crispiness. Reheating in a microwave will make the nests soft.
- Freezing: For longer storage, freeze the baked but unfilled nests as described above. They can be kept frozen for up to 2 months.